Using JupyterLab DataMount
Overview
JupyterLab DataMount provides an intuitive way to access external storage within your JupyterLab environment. This guide walks you through using the extension, from opening the interface to mounting and managing your storage.
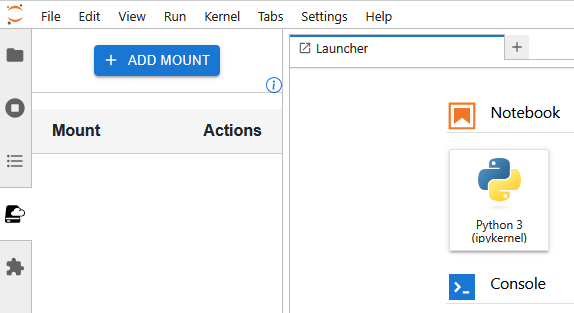
Accessing the Extension
- Open JupyterLab in your browser.
- Locate the DataMount sidebar on the left panel.
- Click on "Add Mount" to open the mount dialog.
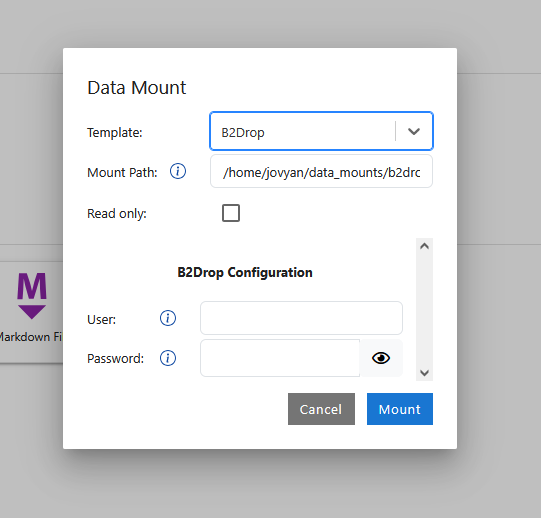
Mounting a Storage Location
- Choose a Template Select from predefined storage templates such as B2Drop, AWS S3, S3-compatible storage, WebDav, or a generic configuration.
- Specify the Mount Path Define where the storage should be mounted within your JupyterLab environment.
- Enter Storage Credentials Provide the necessary details (e.g. bucket name, API keys, tokens, or access credentials).
- Click Mount The extension will establish a connection and mount the storage location.
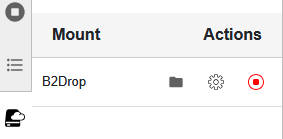
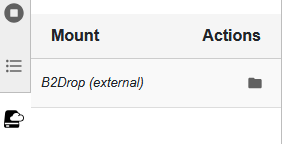
Managing Mounted Storage
- Open Directory: Open directory of mounted storage.
- Show settings: Show settings used during the mount process.
- Unmount: Unmount external storage location.
Working with Mounted Storage
- Access Files: Mounted storage will appear in the JupyterLab file browser, allowing you to open, edit, and manage files as if they were local.
- Read-Only vs Read-Write: Some mounts may be read-only, depending on the configuration.
- Performance Considerations: Remote storage access speed depends on network conditions and storage provider.
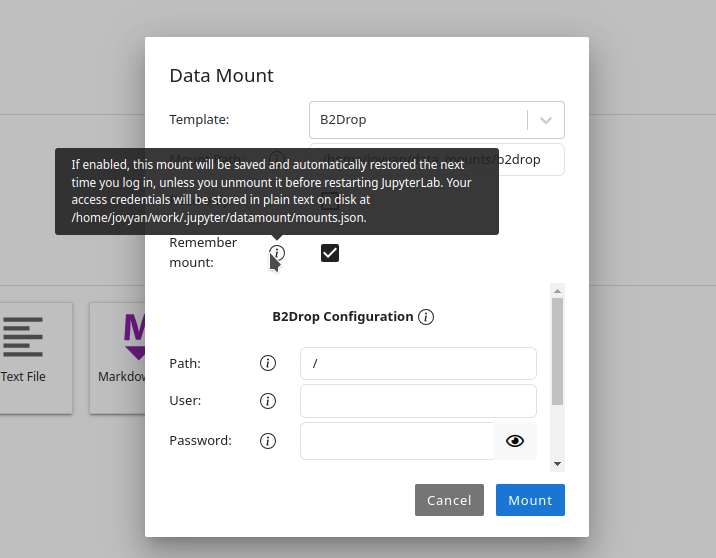
Remembering Mounts
If activated by the administrator, you can remember mount configurations that persist across JupyterLab restarts. When adding a new mount, enable “Remember this mount” to save its settings. The next time you open JupyterLab, they will be mounted during startup.
This feature is especially useful if you frequently connect to the same external storage (e.g., B2DROP, S3, or institutional services).
Your credentials will be stored in plain text in
$JUPYTERLAB_DATA_MOUNT_REMEMBER_FILE.
Preconfigured Mounts
Before starting the JupyterLab, one can preconfigure data mounts. These mounts are set up by administrators and cannot be modified by the user. The underlying configurations remain hidden, ensuring that sensitive credentials are not exposed. This feature allows users to access shared datasets securely for tasks such as data visualization, analysis, or workshops without requiring direct access to storage credentials. Preconfigured mounts are displayed in italic and only provide the "Open Directory" button.
Next Steps
Now that you’ve learned how to mount storage, explore the Storage Templates section for specific details on configuring B2Drop, AWS S3, WebDav, and other storage options.